Tuesday, November 29, 2011

MADE: Bacon-Wrapped Goat Cheese-Stuffed Dates


I usually talk a lot about the recipes that I include here before I get to the recipe itself. This time, though, I'm not going to do that. Look at the title of the post. I just looked at it and I'm salivating already.

Onwards to the recipe.

Bacon-Wrapped Goat Cheese-Stuffed Dates

Ingredients
12 oz dates, pitted
8 oz soft goat cheese
1 lb bacon, sliced and uncooked

Cooking Instructions
Preheat the oven to 350 degrees F.
First things first--fill dates with cheese! Smush the cheese into a plastic bag and snip off a small corner. Use the bag as a pastry bag and pipe the cheese into the dates, being as generous or as stingy as you'd like.
Second--wrap the dates in bacon. Cut each bacon strip in half, and thoroughly wrap the date, as though your'e giving it a little bacon-y sweater. The bacon will shrink as it cooks, so make sure you've provided enough bacon-overlap so that this shrinkage won't unwrap your dates.
When you've done these two steps--Congrats! You're done! Pop them in the oven for twenty minutes, until they're sizzly and delightful. Then--you know what to do--DEVOUR.

Variants: These can be made with turkey bacon (the ones in the pictures are made with turkey bacon), or with a different kind of cheese. I'd like to experiment with a ricotta/gorgonzola mixture next time around. Also, if you're using turkey bacon, don't bother making the strips terribly long--they won't shrink very much at all while cooking, so you can basically just use enough to wrap fully around each date.

Tuesday, November 15, 2011

Upcoming: Produce Basket Week!

Hello there, food blog. Long time, no see.

Today, PresentPaula got a present from PastPaula, who ordered a coupon-funded produce box delivery several weeks ago. In a turn of events surprising to neither PresentPaula nor PastPaula, MovingThroughTimePaula completely forgot about this order, and is now pleasantly thrilled to have found a box full of veggies (and a bit of fruit!) on her doorstep.

Some of the contents include:

  • A grapefruit AS BIG AS MY HEAD. Okay, that's hyperbole, but it is the biggest grapefruit I've ever possessed. Breakfast tomorrow is going to be EPIC.
  • Several kiwis. (Kiwi? Kiwii? Kiwis?)
  • Something resembling a squash with a sticker proclaiming it "Delicata". I do not know if this is its name or a catchy adjective describing its flavor. 
  • BEETS.
  • A large bulb of fennel.
The haul.

I'm incredibly excited about this stash, but I have no idea what to do with some of it (I'M LOOKING AT YOU, FENNEL). Here are my tentative plans for the week:

  • Curry with radishes, tomatoes, cauliflower, and sweet potatoes
  • Squash soup, with a caramelized apple and onion drizzle.
  • Something involving fennel? (Meredith suggests fennel, radish, and grapefruit salad. Hmmm...)
  • BEETS I WILL EAT YOU NOW.
  • Roasted tomato soup, a la smittenkitchen.
I'll post pictures and recipes if I do anything noteworthy! For now, I'm just roasting the beets, chopping them, tossing them with some sea salt and nutmeg, and eating them.
BEETS. IMMUNNAEATCHOO.

Wednesday, August 31, 2011

MADE: Quinoa-Stuffed Tomatoes

Well hey there, cats and kittens. It's been a while.

I could give you excuses for why I've been gone so long. It's not that I haven't been making food, because I have. It's not even because I haven't been taking pictures of my food, because I've been doing some of that, too. It's CERTAINLY not because I have been away from the internet for any amount of time. Don't be crazy.

Things I can potentially use as excuses:

  • I moved from one house to another house.
  • I battled a dragon.
  • I accidentally found myself working two jobs this summer.
  • I spent the month of July doing a meditation-based hiking tour of Mount Ranier while blindfolded.
  • I got a pair of mittens stuck on my hands and couldn't type.
Okay, so I only have two excuses, and they're not terribly good ones. Sorry.
I do have a recipe success, though! Unfortunately, I don't have pictures to go with it, at the moment. However, I'm planning to re-make this tasty dish when I head to the family homestead in a few weeks, so hopefully I'll take pictures then and upload later. It'll be like they were here all along...

EDIT: PICTURES
CHOMP


So these tomatoes.

(First, a detour.) Some people reading this may know a guy who used to sit at my house table as part of something informally called "The Square." The Square was a group of three guys known for entrapping anyone foolhardy enough to sit in the fourth seat at the table (thus, Completing The Square) in thick and twisty philosophical discussion. At one point, I may have completed The Square, or I may simply have been in firing range, because I got into a conversation about human awareness, desires, and consciousness. Specifically, degrees of want. So, "I want ice cream" is a first-degree want. But "I want to NOT want ice cream, because I'm on a diet" is a second-degree want, because the want-er is aware of one level of desire, and is exercising a different level of conscious control, confounding the first-degree desire because of the perceived superior importance of the second-degree desire.

So basically, how I feel about tomatoes.

That's what I told The Square. That I have a number of second-degree desires regarding food. I want to like tomatoes. I want to enjoy watermelon. I want to reap the social benefits that go with the eating of these foods--the connotations of summer and picnics and sunshine and the camaraderie of the universal brotherhood of people-who-think-that-fresh-from-the-garden-tomatoes-are-delicious. To that end, I try out these foods--that otherwise set me gagging--once every couple of years, in the wistful hope that maybe, maybe my tastebuds will have mutated just a teensy bit, and I will finally be able to take part in the summer that is watermelon and tomatoes and red checkered picnic blankets.

After I gave this answer, The Square chatted a bit about how social pressures could be an incitement to second-degree desires, and then probably went on to talk about Plato and the mutability of market forces. I don't remember. But now I can't think about any of those second-degree want foods--tomatoes, watermelon, beer, goat cheese--without thinking about that conversation. (It always comes back to meals at the house table, doesn't it? Call me, UChicago. I'm ready for my alumna soundbite.)

This meandering preface is simply to say that I've achieved one of these second-degree wants. I've developed a taste for tomatoes.


Anyone who has known me for several years or more, now's your chance to freak out.

...
...
...

And done. Freakout over. Pull yourself together. Geez. How do you think I feel? Anyway, recipe. It's full of all the summery things I could find in my fridge, plus some that I found at the farmer's market. The quinoa stuffing was intended to draw the moisture out of the tomatoes, which it did admirably. It also had the added benefit of crisping on top, much like a crust of bread crumbs would have done. The dual-natured quinoa--crispy on top, soft and tender inside--was my favorite surprise of the recipe. Apart from how delicious it was, of course.

Quinoa-Stuffed Tomatoes
(makes 2 servings)

3 medium tomatoes, halved--I used roma tomatoes, sliced lengthwise, to give me a bit of a long boat shape
1/3 cup quinoa
2/3 cup water
1 slice bacon
1 tbsp crumbled feta cheese
1/2 tsp brown sugar
Pinch nutmeg
Freshly ground black pepper, to taste
2 tbsp pesto
2 oz goat cheese
Olive oil, for drizzling

Preheat oven to 325 F.
Cut/scoop out the innards of the tomato halves. I did this simply using a knife dragged around the line between rind and pulpy, seedy flesh. Remove innards to cutting board and dice.
Empty tomatoes, waiting to be filled with delicious.


In small saucepan, heat water on medium-high to just boiling. Add quinoa and lower heat to a simmer. Toss in the diced tomato guts and juice. Keep heat on for one minute more, stirring to make sure all the quinoa is evenly cooking, and then cover, turning off heat entirely.

Chop the strip of bacon into nice 1/4 inch chunks. Once quinoa seems sufficiently bathed in steam and tomato juices (quinoa should be translucent, instead of bright white, with some stem showing), add the chopped bacon and feta. Stir, grinding and sprinkling in the sugar and spices. Set aside briefly.

Now, it's time to fill those tomatoes! Hooray! Put the tomato hulls on a baking sheet or in a shallow baking pan. Line each one with a spoonful of pesto.

Then add a heaping spoonful of the quinoa/bacon/feta/allofPaula'sfavoritethings mixture to each. It's fine if it overflows a bit--the tomatoes will probably get a bit collapse-y anyway. Then, top each tomato with a slice of goat cheese, smushed out to roughly cover the stuffing. (The coverage isn't important--don't worry.)

Drizzle the whole thing with olive oil and place in the oven for 20 minutes, or until the tomatoes start to get collapse-y and the topping gets nice and brown and crispy. Then, while pondering the social forces which led me to this recipe, DEVOUR.

The tomatoes that live on my back porch.
Sometimes I eat them. Right off the vine.
You don't know me.

Sunday, May 22, 2011

MADE: Chocolate Chocolate Mousse Cups


I think that the process of making these delightful little dessert cups was a bit like the process of giving birth.

Bear with me here.

I've heard that the process of childbirth is so traumatic that a woman's brain and body actually repress it, because otherwise women would just warn their daughters away from the shrieking horror of having babies and the species would die out.
Similarly, these little chocolate cups were SO DARN CUTE and SO FREAKING DELICIOUS in the light of day that it almost blocked out the traumatic, frustrating, painful hours of splattering chocolate and uncooperative latex.

Almost.

Despite that frustration, though, I'm putting the pictures and recipes up on the blog because I'd like to make them again. They were adorable and delicious, as stated, with a definite 'wow' factor that upped my little event to at least a capital-B Brunch. 
Yep. I'm a sucker.

Chocolate Cups

Ingredients
10-12 oz Ghirardelli semi-sweet chocolate chunks
1 package small balloons
Patience

Line a baking sheet (or two, depending on how many cups you're making) with wax paper, parchment paper, or aluminum foil.
In a double boiler (or a fake double boiler setup, with a small saucepan nestled into a larger water-filled one over medium-high heat), melt chocolate until smooth. Then remove from heat.

Blow up the number of balloons you'll need, so that the bottoms are the size that you'd like your cups to be, and then tie them off. I made two dozen balloon-cups, all relatively small (about 2.5" in diameter and 2" in height). I also used water balloons, because I thought they'd be more resilient. (Also, Walgreens only had water balloons. First world problems--I got 'em.) The use of water balloons necessitated filling the balloons up with water to stretch them out, then emptying out the water and blowing them up with air. In the process I got drenched and lightheaded. And every single one of my roommates made fun of me. Fair warning.

Now you've got balloons and melted chocolate. Simple instructions: Dip the non-tied bottoms of the balloons into the chocolate, rolling the balloon slightly to get a smooth covering all the way around, reaching a little way up the side of the balloon.
THIS SOUNDS DECEPTIVELY EASY. DON'T BE FOOLED. Temperature is the tricky part. The chocolate needs to be warm enough to form smooth layers, but cool enough so that it doesn't pop the balloon when you dip it in or roll it around. (This is where the spattering chocolate comes in. And boy, is it fun.) It might take a bit of trial and error, and you might have to go through a few re-warming/re-cooling stages.
Once you've got your balloon dipped in chocolate and successfully non-popped, set it onto the covered baking sheet. Fill up the baking sheet with chocolate-dipped balloons--they don't need a lot of space, just make sure they're not touching--and refrigerate for a few hours or overnight.


Once the chocolate is sufficiently cool and hardened, cut off the knots of the balloons and pull them out. Taa-daa! You've got beautiful chocolate dessert cups! Fill them with chocolate mousse, whipped cream, or ice cream, and serve to your delighted guests! Just make sure that your guests know that the bowls are edible! Otherwise they'll wind up almost trying to wash them, by mistake. (I'm not kidding. This actually happened at the party.)
Oh, and DEVOUR, for good measure.

N.B.: The chocolate cups will get pretty melty pretty quickly, so I'd freeze them if you're not using them right away. Also, don't try to fill them with anything hot. I'm getting stressed just imagining what that would turn into...


MADE: Chorizo Gratin


Sometimes you accidentally wind up at a speakeasy with your good friend Sambert. What's that you say? You've never wound up at a speakeasy with Sambert? Let me tell you--you're missing out, my friend. Specifically, you're missing out on this food.
While the whole "accidental speakeasy" night was pretty awesome overall, this chorizo gratin was a highlight. Such a highlight, in fact, that Sam and I couldn't help but make it for ourselves--in a more generous portion, of course. With a little help from the Seattle Cheese festival, we whipped this up and DEFINITELY DID NOT eat the whole thing.
Pictorial representation of "help from the Seattle Cheese Festival"


Chorizo Gratin*

Ingredients
1 tsp vegetable oil
1 lb chorizo sausage
2/3 cup diced onion
1/2 tsp salt
1 tsp sugar
1 red pepper, diced
1/4 cup sun dried tomatoes
1 lb gruyere, coarsely shredded
1 loaf crusty bread, sliced and toasted

Preheat oven to 350 degrees F.
Heat oil in a skillet over medium high heat. Chop chorizo into small chunks and cook until browned and delicious-smelling. Remove from pan to a medium-sized casserole dish. Put onion, salt, and sugar into the skillet with the chorizo dregs, and keep over medium heat, stirring occasionally. When the onions begin to brown and stick to the pan, add a splash of water (about a tablespoon or two) and stir vigorously. Repeat this process three or four times until onions are deep brown and sweet-smelling.
The onions, they are a'caramelizin'

Add diced peppers and tomatoes to the skillet, stirring occasionally for about five minutes, or until you get too impatient.

Dump the caramelized vegetable concoction into the casserole dish with the chorizo and stir together until evenly mixed. Cover--and I do mean COVER--the whole thing with handfuls of shredded cheese. Pop the casserole in the oven for twenty minutes, so that everything gets melty and bubbly. Serve atop your toasted crusty bread and DEVOUR.


*Yes, we are aware that this recipe doesn't actually have a starch base, which possibly negates its claim to being a gratin. That's what the speakeasy called it, however, and so that's what we're calling it. SO THERE.

Tuesday, April 5, 2011

MADE: Grilled Cheese Grilled Cheese

Sometimes, the internet does something so beautiful, so incandescent, that one has to stop, drop everything, and take part in the splendor.

This is one of those things.
Watch this video. Make this grilled cheese sandwich. Don't think. Don't stop to ask questions like "Why?" or "What have I done to deserve such majesty?" Just do it.

I have just made myself one of these sandwiches.
I am eating it now.
The angels are weeping rainbow tears of joy.

Monday, February 28, 2011

MADE: Buckeyes!


A boyfriend says, "Hey, Valentine's Day is coming up. Is it all right if I don't do anything special, or buy you anything?"
The girlfriend responds, "Absolutely! Valentine's Day isn't about stuff. It's about love!"

This would have worked out fine if A) Boyfriend's line hadn't meant "I'm actually going to TOTALLY FORGET Valentine's Day, like only a character in a sitcom could." and if B) Girlfriend's line hadn't meant "You're so cute, pretending that you're not doing anything for me for Valentine's Day. Such a clever cover for the ACTUALLY TOTALLY ROMANTIC THING that you're going to surprise me with!"

So the moral of the story is twofold: Listen rationally to your significant other when he or she talks about his or her expectations, and make yourself candy on Valentine's Day. Because your boyfriend's sure not going to. Nope, he's going to spend all day in the math library cozying up to the Kummer theorem and topological cohomologies.

Ahem.

Buckeyes!

When I think "making candy," I am immediately intimidated and visions of complicated alchemies involving thermometers and double boilers dance through my head. No such drama with buckeyes. They're spectacularly easy to make and also tons of fun. If dipping things in chocolate constitutes "fun" for you. If it doesn't, you should probably stop reading now and reevaluate your life. Just saying.

Buckeyes
Adapted slightly from Smitten Kitchen's delightful recipe

1/4 cup (2 tbsp) cream cheese
1 1/2 cups peanut butter--I used about 1 cup smooth and 1/2 cup crunchy, to give them a bit of texture
1 cup graham cracker crumbs
1/4 tsp salt
2 1/2 cups confectioner's sugar
10 tbsp unsalted butter, melted and cooled slightly
12 oz dark or bittersweet chocolate (I used Ghirardelli 60% cacao chunks. It was a good life choice.)

Cream together cream cheese and peanut butter. Choosy bloggers choose Jif.
Add graham cracker crumbs and salt mix until combined. Then alternate additions of sugar and butter, stirring until thoroughly mixed after each addition. Mix some more, for good measure. When everything is combined, the mixture should basically be sturdy peanut butter dough. Try not to eat it all on its own.

Now for the chocolate coating.
Melt the chocolate in a double boiler, or in the microwave. I used the microwave, and heated it in 15 second bursts, stirring after each one. When chocolate is smooth and thoroughly melted, you're ready for dipping!

Line a baking sheet with parchment paper and roll the peanut butter dough into balls. I made mine about a teaspoon each, and wound up with a delightfully large number (see picture below for about 2/3 of the batch.)

With a skewer or fork or chopstick--something pointy--dip the peanut butter balls into the melted chocolate. As Smitten Kitchen says, it may take a few tries before you've mastered your own personal technique. She recommends tilting the container of melted chocolate and spinning the dough balls in it, but I found that method prone to breaking the little buggers in half. Instead, I just skewered them and submerged them at an angle, until most of the peanut butter was covered in chocolate, leaving only a little of the doughy goodness showing through. Somehow, SK got hers to come out without the skewer-holes being visible. She's a wizard of some sort. I, being mortal, just embraced the holes as necessary imperfections that in no way inhibited deliciousness.

After you've chocolate-dipped all of your peanut butter dough balls, put the baking sheet in the refrigerator to cool for at least a half hour. It may be difficult to wait that long, knowing that those little balls of peanut-butter-chocolatey goodness are just sitting in there, but be patient.

Then, DEVOUR. Because it's Valentine's Day, and you deserve it.*

*In place of this reasoning, feel free to use any other rationale that occurs to you.

Sunday, February 27, 2011

UPDATE: Cheese and Dating

This diagram basically explains A) how I approach "vegetarian" cooking, B) why I will never be a vegan, and C) why KPBH is great, and why I'm still dating him. He's the "vegetarian boyfriend" from the last post, and he sent me this today because he knows me too well.
The couple that covers everything in cheese together stays together? Probably because they get too fat to go anywhere else...

Saturday, February 26, 2011

MADE: Chicken Pot Pie

Not Chicken. Raw chicken is just not photogenic.

Something I'm proud of: I made it through college without once buying Ramen.

That is not to say that I didn't sink to some pretty low food-MacGyvering in times of dire financial straits. Did I attend meetings of clubs I didn't care about because there was free Thai food at said meetings? Possibly. Did I steal spinach and cereal from the dining hall in plastic bags and tupperware? Of course. Did I ever convince myself that saltines and peanut butter constituted a sandwich, and thus a meal? It's better not to remember that time.

Through the majority of those rapscallion years, I dated a vegetarian,* cooked with a vegetarian, and thus effectively became a vegetarian when not at restaurants. I developed plenty of opinions about vegetarian cooking and eating during that time (For instance--making a "vegetarian" version of something does not mean "replacing the meat with EVERY VEGETABLE KNOWN TO MAN." To the misguided folks who do this--you are the reason that veg-haters hate. Not cool.) One thing that's fact, rather than opinion, though, is that buying meat is expensive, making vegetarianism a lifestyle of convenience for perpetually-poor college students.

When I went home for the summer, then, I was used to cooking vegetarian dishes. This would have been fine, except for a certain punk kid brother of mine. We'll call him Luke. I'm pretty sure he's a hipster Tyrannosaurus with a GPS implanted in his brain. If an entrée doesn't have meat in it, he sends it back. Or just complains a lot. As the summer wore on, I quickly grew tired of his pre-teen snark, and endeavored to make more food WITH MEAT IN IT. This chicken pot pie--perfect for feeding a ton of people, particularly if one of them is a secret T-Rex--was one of the recipes that sprang from Luke's demands, and one of the best. I cobbled it together from a variety of recipes and was pretty pleased with the result. It's a pretty flexible recipe, and the mix of spices and veggies is quite open to interpretation. A more traditional pie might have peas, corn, and green beans in it, while an even meatier version (that I might cook up in the near future?) would obviously contain bacon.

Pastry Crust
8 tbsp butter, chilled
3/4 cup flour, plus some for dusting and flouring surfaces
1/4 cup ice water

Cut butter into flour with a pastry blender until the mixture resembles coarse crumbs. Turn the mixture onto a working surface and mix in the water a little bit at a time, until the dough just clings together--this might not use all of the water.
"Turn" the dough by kneading/rolling it flat (about 3/4 inch thick), folding it in thirds, and kneading/rolling it flat again. The first couple of "turns" will be more like "flops," as the dough gets itself cohering. Do about nine turns in all, then let dough rest for a half hour, in the fridge if you'd like. (This is a good time to do some work on the filling.)

Filling in a Skillet
1 tbsp butter
1 medium onion, diced
2 cloves garlic, chopped
1 red pepper, diced
Salt and pepper to taste
1 tbsp Raspberry Pepper Jelly (optional, but delicious! You could also use a hot pepper or chili powder for a little extra zing.)
Splash of white wine (just how big of a splash is up to you...)

Melt butter in a medium skillet. Add diced onion and garlic and cook for about two minutes, stirring occasionally. Add the peppers and reduce heat, simmering for ten minutes, still stirring occasionally. Sprinkle in salt and pepper to taste, and add any spicy goodness during the simmering. Add boiled chicken (see below) and splash in white wine, stirring briskly until the wine is mostly cooked in. Set aside until pot pie assembly.

Filling in a Pot
3 medium potatoes, diced
1/2 head cauliflower, cored and chopped
1/2 cup baby carrots, diced
1 small tart apple, cored and diced
2 boneless, skinless chicken breasts, diced

Bring a pot of water to a boil. Toss chicken chunks into the boiling water for about five minutes, until whitish rather than pinkish. Leaving water boiling, scoop out chicken and deposit in skillet. Drop in vegetable and apple chunks and boil for 10 minutes, or until slightly softened. Scoop out veggie and apple chunks into the pot pie container--a deep stoneware bowl works best, but a general casserole dish works too. Add the skillet mixture once it's tender and delicious, and mix well, adding additional salt and pepper to taste. A sprinkle of cumin or sage wouldn't go amiss here, either.

Filling in a Saucepan
3 tbsp butter
1/4 cup flour
1 1/2 cup milk
2 1/2 cup chicken stock, water, or the reserved water from the boiling pot
Pepper and a sprinkle of nutmeg

Melt butter in a medium saucepan over medium heat. Once butter is thoroughly melted, add flour and whisk briskly for about two minutes. The mixture should be thick and goopy--a little like cookie dough. Add the milk a little at a time, whisking until smooth after each addition. After all the milk has been added, cook for three minutes, stirring occasionally with particular attention to the sides and corners of the saucepan. Add the chicken stock one cup at a time, stirring until smooth after each addition. Cook for an additional 3 minutes, then remove from heat.

Final Assembly

Heat oven to 425 degrees F.
If you haven't already, combine skillet mixture (onions, peppers, and chicken) with pot mixture (veggies and apples) in a large casserole dish or oven-proof stoneware bowl. Pour the saucepan of gravy over the vegetable mixture and mix everything together. This is a good time to do a taste-test, making sure that no last-minute spice additions are needed.
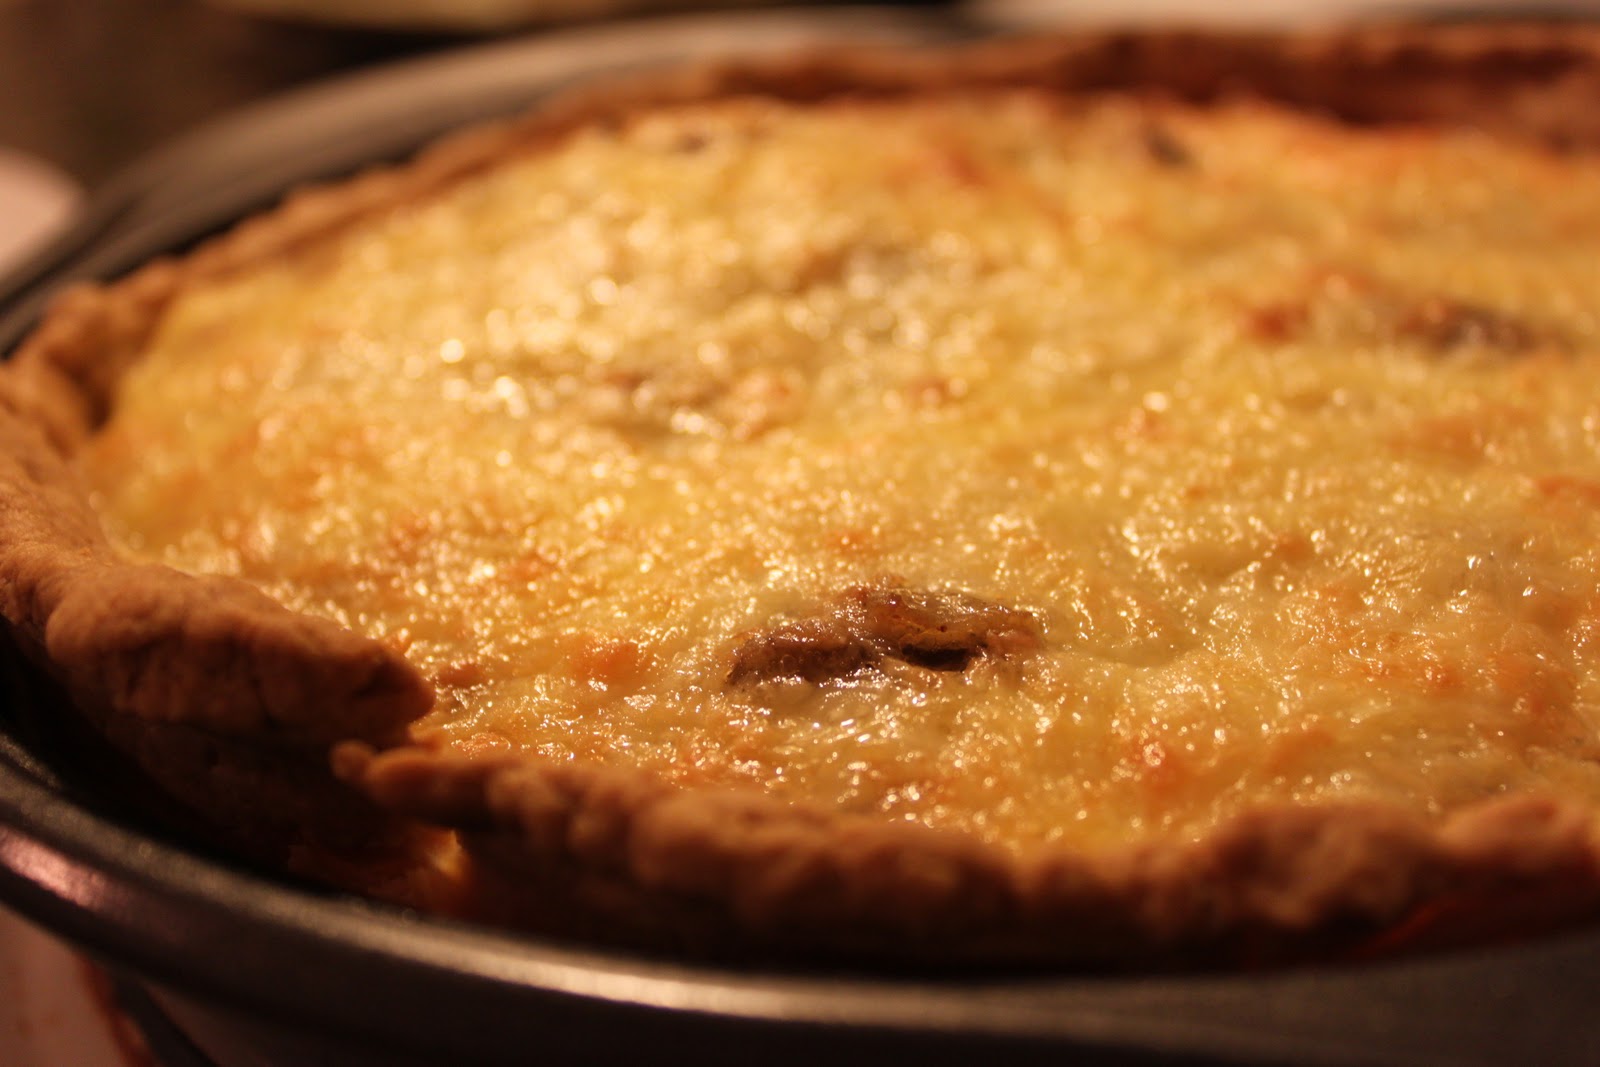
The dough's had its little rest, so bring it back out and turn it a few more times. Then, roll it out to a little larger than the circumference of the pot pie bowl. Lay the dough over the filling, pressing around the edges of the bowl to seal. Cut a few knife slits in the top of the crust for ventilation. If you'd like, brush an egg wash over the top of the crust to get a nice golden brown crispness--I mixed my egg with a splash of water, a twist of sea salt, and the tiniest smidge of chili powder.
Bake for 30-35 minutes, until crust is just golden and filling begins to bubble around the edges. (If your pie is particularly full, you might want to put a baking sheet underneath the dish to catch bubble-over.)
Then DEVOUR, particularly if you are a carnivorous Cretaceous predator disguised as a blonde miscreant sibling.
Bubbled over. Still delicious.


*Just in case you were worried, I'm still dating him. He's less of a Real Vegetarian now, though. More of a Vegetarian of Convenience.

Saturday, February 5, 2011

MADE: Beet Soup


Apparently beets are mysterious? When my Saudi Arabian roommate mistook my beet soup for some kind of strawberry gelato (and subsequently refused to believe that it was soup and made of vegetables), I assumed that it was some kind of cultural divide.

But then my other--very American--roommate and his girlfriend exhibited similar confusion, just moments later. Did you guys never have to eat beets as a child? I remember being grossed out by them, and confused as well. They were one of those vegetables that straddled the line between savory and sweet--an unacceptable breach for my fragile childhood psyche.

I've rediscovered them in my cooking adventures, however, and they've fallen onto the "Ingredient Obsessions" list. (Other past list-makers include spinach, sweet potatoes, and sour cream. Ask my beleaguered boyfriend, who frequently has to gently pull me back from cooking frenzies with questions like "Do we really need to put sweet potatoes in the lasagna?" and "Are you sure that you should buy another three bags of spinach at the grocery store?")

Beet soup is both delicious and aesthetically pleasing--that bright red color makes a cozy winter soup that much cheerier. Also, chopping up beets leaves you with red hands and knives--a fun little reminiscence of Lady Macbeth, for those who are inclined to be amused by such things. (Me.)

Soupstravaganza #1
Beet Soup
1 tsp olive oil
1 clove garlic, chopped (or ZOOMED)
1/3 onion, diced
1/2 tsp salt
1/2 tsp freshly ground black pepper
1 medium potato, peeled and diced
3 medium beets, peeled and diced
4 cups water or chicken broth
1 bay leaf
1 tsp lemon juice
Sour Cream, for serving

In a medium pot or large saucepan over medium-high heat, sauté garlic and onion in olive oil until onion is tender and begins to clear, but not brown, about four minutes. Add salt and pepper and sauté one minute more. Add potato, beets, water or broth, and bay leaf. Bring the ingredients to a boil, partially covered. Once boiling, continue to cook for about 20 minutes, or until potato and beet pieces are tender.


Remove from heat and allow to cool for five minutes. In three batches, transfer soup to a blender and blend for about 10 seconds, until soup is somewhere in the median state between chunky and smooth. Mix blended soup back into the pot, add lemon juice, and stir until mixed. 
Distribute among bowls or package in airtight containers for freezing and storing. For serving, stir in a dollop of sour cream. DEVOUR, of course. 

UPCOMING: Soupstravaganza

A few days ago, I had had enough of academia. Somehow, this translated itself quite clearly into "Make a ton of soup!" Dutifully, I headed out to my local produce stand and stocked up. I bought...well, a ridiculous amount of varied vegetables and fruits. And then I brought them back to my house and spent several hours chopping, dicing, boiling, stirring, blending, and packaging into freezer containers. (Strangely, the last step is the most problematic in my house. For whatever reason, we have a drawer full of lids and a drawer full of containers, but amongst all that, we only have about four matching container-lid sets. It's bizarre.)

The recipes to my creations will be up later this weekend. For your anticipatory pleasure, I'll be recipe-ing:

  • Beet Soup
  • Fennel, Pear, and Squash Soup
  • Creamy Potato and Leek Soup
Get ready! SOUP.

Saturday, January 29, 2011

MADE: Spinach, Mushroom, and Bacon Quiche

"Why all the cheese?" "It's quiche night, OBVIOUSLY."

One of my New Year's Resolutions was going to be "Eat less food whose primary ingredients are butter and cream." Then I got my Christmas present from Boss Tweed--a copy of Dorie Greenspan's Around My French Table, and my New Year's Resolution crumbled before the New Year had even begun. It's an AMAZING cookbook, and almost every page contains a recipe as mouthwatering as it is undaunting. And full of cream and butter.
I fully intend to cook most of the items in this cookbook--perhaps when the Boss herself comes to visit me in March! (Be prepared for a slew of posts and jealousy, because it will be a cookingstravaganza for sure!) I started, though, with a quiche, more because I wanted to make a quiche than because I wanted to use the cookbook. But I figured that my new French cookbook would be a good place to start.

Greenspan's original recipe calls for a tart crust. It turns out that one has to refrigerate a tart crust for several hours, and I certainly didn't have time for that (I'm not known for planning ahead when it comes to cooking), so I fudged it a little bit, and perhaps ruined the tart in the process? The taste and texture came out just fine, though, so I'm inclined to think that the three-hour chill period is a scam.
Also, Greenspan's original recipe called for 1/4 cup cheese. I assumed that to be a printer's error, and used an entire cup of cheese. This is probably why my "cook for myself" philosophy has not been a weight-loss solution, but rather the opposite.

Spinach, Mushroom, and Bacon Quiche


Tart Crust
1 1/4 cup flour
1/4 tsp salt
6 tbsp butter, cold or frozen, cut into 1/2 tbsp chunks
1 large egg
1 tsp ice water

Quiche Filling
6 oz spinach leaves
4 slices bacon
1/2 medium onion, chopped
2 cloves garlic, chopped
8 white mushrooms, diced
Salt and pepper, to taste
3 large eggs
2/3 cup cream
1 cup shredded cheese (I used equal parts swiss, gruyere, and mozzarella)

To make tart crust:


Whisk together flour and salt. Cut in butter with a pastry blender until mixture resembles coarse meal. Beat together egg and water, and drizzle over the dry mixture, tossing with a fork until evenly moistened, and then mixing together by hand. Form dough into a ball, kneading until smooth, and then pat into a flattened disk. Refrigerate this for three hours (supposedly--I only refrigerated it for one, and things turned out fine).
Once you've refrigerated the disk of dough, bring it out and roll it out. Greenspan recommends rolling it between two sheets of plastic wrap, which worked pretty well and made flipping it into the pie pan pretty simple. Roll the dough into a circle big enough to cover a 9" pie pan--about 12" in diameter--and then turn the dough into a greased pie pan. Make sure there are no cracks in the crust, because it will probably shrink, and your filling will wind up leaking out if there are cracks. Puncture the dough lightly in several places with a fork, cover with foil, and refrigerate again for another hour or so. (This is a good time to make the quiche filling.)
Heat the oven to 400 F.
Bake the crust for 20 minutes with the foil insert, then remove the foil and bake for 3 to 5 minutes more. Remove partially baked crust from oven and let cool before adding filling.

To make filling:


Spinach first--rinse spinach leaves and then toss into a skillet while still wet. Cook over medium heat until the spinach is wilted but still bright green, about five minutes. Remove from heat and put spinach onto a napkin-covered plate to soak up the excess liquid. Then, when the spinach is cool enough, transfer it to a cutting board and chop it well.
Bacon next--put the slices of bacon onto a skillet over medium-high heat and fry until crispy. Remove from pan to a paper towel-covered plate. Drain off all but one tablespoon of the bacon grease from the skillet. When bacon is cool enough, chop well.
Now all the rest--put the onion and garlic into the bacon-greased skillet and sauté for two minutes over medium-high heat. Add mushrooms ansauté for two minutes more, adding a tablespoon of water if the vegetables begin to brown.
Mix together chopped spinach, chopped bacon, onions and mushrooms, and season with salt and pepper. When partially-baked crust is cooled sufficiently, spread the filling mixture evenly throughout the bottom of the crust.

In a medium bowl, beat the eggs and the cream together. Pour over the filling so that it fills in all the cracks. Sprinkle cheese evenly over the top of the quiche.
Place quiche pan onto a baking sheet (to save your oven in case of bubbling over) and carefully put into the middle of the oven. Bake quiche for 30 to 40 minutes (still at 400 F), or until the filling has become puffy, even in the middle. Remove, let cool, and then DEVOUR.

Tuesday, January 25, 2011

EPIC CROWD PLEASER: Marianne's Sticky Toffee Cupcakes

WARNING: THESE CUPCAKES ARE RIDICULOUS IN A VARIETY OF WAYS. YOU WILL WANT TO EAT THE WHOLE BATCH. DON'T EAT THE WHOLE BATCH.

There. Got that off my chest.

The goddess Marianne once--for no terribly good reason, if I remember correctly--gave me an entire box of these. I ate almost the entire box. Sure, I offered them to my family, but I offered them at different times, so that for each family member who ate a cupcake, I also ate a cupcake. I don't know if you guys know how many family members I have, but let's just say that it came out to me eating a ton of cupcakes.

Then Marianne gave me the recipe. And I saw the amount of butter involved. And I added up the amount of cupcakes I'd eaten in the past 12 hours. One of the worst/best days of my life. Best for my taste buds, worst for my heart (the physical one, that doesn't get along with butter so swell...).

This is why I urge again: Don't make these if you don't have a very specific distribution plan. Otherwise, you will pull the pans out of the oven and then wake up three days later from your sugar coma, face and hands sticky with toffee. And then you'll die of a heart attack. But a happy heart attack.

Marianne-is-a-Wicked-Woman Sticky Toffee Cupcakes


Cupcakes
1/2 cup (1 stick) unsalted butter, room temperature (wrapper saved to grease tins)
2 cups all purpose flour, plus more for tins
1/2 cup water
1/2 cup brandy
8 oz plump, moist dates, halved and pitted
1/4 tsp baking soda
1 1/2 tsp baking powder
1/2 tsp salt
1/2 tsp ground cinnamon
1 cup packed dark brown sugar
2 large eggs, room temperature

Toffee Glaze* 
1 cup heavy cream
1 cup packed dark brown sugar
4 tablespoons unsalted butter, room temperature
1/4 cup brandy
1/4 tsp salt

Preheat oven to 350 F.
Grease the tins of a muffin pan with the butter wrapper (and additional butter, if necessary). Flour greased tins and dump out excess.

Bring water, brandy and dates to a boil in a saucepan over medium-high heat. Reduce heat to medium low; cover and cook until dates are very soft--about five minutes. Transfer mixture to a blender and puree until smooth. Let cool fifteen minutes.

Whisk together flour, baking soda, baking powder, salt, and cinnamon. With an electric mixer on medium high speed, cream butter and brown sugar until pale and fluffy. Add eggs, one at a time, beating until each is thoroughly mixed in. Reduce mixer speed to low. Add flour mixture in three batches, alternating with two additions of date-brandy puree, and beating until just combined after each addition.

Divide batter evenly among prepared muffin cups. Bake, rotating the muffin pans halfway through the baking process, until a cake tester in the middle comes out clean--should be about 20 to 25 minutes.

Toward the end of the baking time, make the Toffee Glaze. In a medium saucepan, bring cream, brown sugar, and butter to a boil over medium high heat, stirring occasionally. (I love that direction.) Cook for three minutes. Stir in brandy and salt, and cook one more minute.

As soon as the cupcakes are removed from the oven, use a toothpick to lift one side of each cupcake so that they are all standing on edge, raised slightly out of the tins. Using your fingertips to lift each cupcake a bit more, spoon two tablespoons of glaze into each cup, then nudge the cupcake back into place. Let cool 10 minutes.

To finish, invert the cupcakes onto a wire rack set over a baking sheet (or just onto a baking sheet, if you don't have a wire rack handy) and spoon two more tablespoons of glaze over each one. Let set for about five minutes (if you can wait that long) and then DEVOUR. But Please--SHARE!

*The Toffee Glaze is AMAZING even on its own--probably has something to do with the fact that it's nothing but brandy, cream, and sugar. Oh, and butter. Any leftover glaze CANNOT be thrown out. Instead, put it on ice cream, toast, scones, a spoon, or anything else that needs a bit more deliciousness.

MADE: Scones!

I figured that since I'd finally put up the Apple Cheddar Scones--I'm still shocked about that glaring omission, by the dubs--that I'd fess up to my deeper love of scones in any variety. For a while in undergrad, my House raised money for charity by selling coffee and baked goods in the morning. I frequently volunteered to help sell the goodies, which entailed getting up at six thirty and dragging myself down to the lobby of my dorm. As I stumbled down the last few steps, I'd invariably be greeted by the dueling aromas of coffee and scones, and by the preternaturally happy visage of my dear friend Klara, the magnificent baker of said scones.

Klara was (and still is) a marvel and an inspiration. At six thirty on a Tuesday morning, she could reach levels of  happiness than some people don't achieve in their entire lives. And she was constantly spreading that happiness to others--through laughter, through volunteer work, through dancing and singing, and--probably most importantly--through scones.

Now, whenever I make or eat a scone, I can't help but think of Klara and get a tiny bit infected by her sunniness all over again.

Klara's Scones
2 1/4 cups flour
Pinch o' salt
1/3 cup sugar
2 tsp baking powder
6 tbsp cold butter, cut into cubes
1 cup cream
Fillers--these can be berries, baked apples, chocolate chips, or even chunks of caramel candies (that was such a good morning!)

Preheat oven to 425 F.
Combine dry ingredients and whisk together. Cut in butter until mixture resembles coarse meal. Stir in cream, kneading together by hand. Add in filler ingredients and knead into a ball, then roll out the ball onto a floured surface and press down to create a circle of dough about a half inch thick. Cut the dough circle into wedges and place onto a greased baking sheet, about 1" apart. Sprinkle with sugar, if desired.
Bake for about 15 minutes, or until just hard and slightly golden.
"Consume and be Merry!"--Klara

For my roommate's birthday, I made these with blackberries as a breakfast surprise. It went over well, if I do say so myself.
The picture is the scones in progress, obviously. The finished products themselves were devoured before photographic evidence could be obtained.

Sunday, January 23, 2011

CURRENT OBSESSION: Apple Cheddar Scones

Woah woah WOAH Woah woah. Upon looking through my old posts to spruce them up with pictures--now that I FINALLY have all the relevant bits of gadgetry necessary to create, transfer, convert, and upload photographic evidence of my foodery--I have discovered that I NEVER MANAGED TO PUT UP THE APPLE CHEDDAR SCONE RECIPE.

Major. Fail.

If you've so much as brushed past my internet presence in the past three months you've probably heard me rave about these scones. If you've been in my actual presence, it's quite possible that I've baked them for you. (Really, it's less generosity and more a realization of the overwhelming guilt that ensues when one consumes an entire batch of scones in one sitting. Not that that's ever happened...)

The amazing Smitten Kitchen introduced me to them, of course, and I made my own little tweaks. SK calls them "October on a parchment-lined baking sheet," but I've been making them since waay past October, and I've never lined my baking sheets with parchment. Both choices have turned out pretty okay for me.*

Apple Cheddar Scones (Will Haunt You Forever)
2 firm apples (I used Galas most of the time, but that's just because they were around), cored, peeled, and chopped into small chunks
1 1/2 cups flour
1/4 cup white sugar
2 tsp brown sugar
1/2 tbsp baking powder
1/2 tsp salt
6 tbsp butter, chilled and cut into 1/2 tbsp cubes
1/2 cup sharp cheddar, shredded
1/4 cup heavy cream
2 large eggs

Preheat oven to 375 F.
Core and peel the apples, then chop them into smallish chunks. The original recipe called for them to be in 1/16ths, but those chunks seemed huge, and just had to be chopped down later. (Also, the smallish chunks cook faster. Bonus when you're really hungry for some sconey goodness.) Spread apple chunks evenly on a baking sheet and bake at the center of the oven for about 15 minutes, until dry to the touch and just beginning to turn goldeny brown. Remove from oven and cool completely, leaving oven on--if you're going to make the scones right away, that is. Turn it off otherwise. Sheesh.
Baked Apple Chunks--Health food, right?
Whisk together flour, sugar, baking powder, and salt.
With a pastry blender, cut in the cubes of chilled butter until mixture resembles coarse crumbs. Beat in cream and one egg until just combined. Mix in the shredded cheese as well.
Chop up the apple chunks a bit more until you'd feel comfortable encountering them in a scone, then mix the chunks in as well. You should have a delightful, sticky mess on your hands, just forming a ball. Toss that onto a floured surface and flatten slightly, until you've formed a circle about 1" thick and 8" in diameter. Slice the circle into six wedges--or eight, if you're feeling generous. Place dough wedges onto greased baking sheets, leaving about 2" between them for spreading.
For an egg wash (which is optional, but quite tasty), beat together the remaining egg and a pinch of salt. Spread the mixture over the top of each scone. Sprinkle each washed scone with sugar. Or, if it's Christmas Eve morning, sprinkle them with sugar and Christmas sprinkles! Bake for about 30 minutes, until the scones are nice and golden. Then DEVOUR. Also share. You might as well get as many people to understand the addiction as possible...
If you are keeping them to yourself, though, freezing several of the dough wedges is a good idea--the scones are really best when eaten immediately, and it's great to have scones ready-for-baking in the freezer on a bleary morning...

*In case you're wondering, though, ovens get really angry at you if you try to substitute wax paper for parchment. It wasn't for this recipe--don't worry--but every mention of parchment paper in cooking makes me flash back to that experience. Eeesch, the smell...

Saturday, January 22, 2011

MADE: Guinness Shepherd's Pie

I currently live in a city that is rainy and grey for most of the winter months. When I come home from a day that never got sunny, I just can't bear the thought of anything less than a blanket-like dinner in which to wrap myself (figuratively--don't worry) and forget the grim exterior conditions.

For inspiration, I figured I'd turn towards cuisine of similarly-climated locales, and shepherd's pie seemed like a no-brainer. If it's good enough to fortify soggy peasants in Ireland, then it can help me soldier on through the Seattle winter. Tossing in a portion of my leftover bottle of Guinness seemed like a logical addition, for similar reasons. (It turned out to be not only logical, but DELICIOUS as well--but I'm putting the cart before the horse. Perhaps several carts before several horses.)

Guinness Shepherd's Pie

Brown Sauce Filling
4 tbsp butter, divided
1/2 small onion, diced
1 tsp salt
1 tsp brown sugar
10 (or so) white mushrooms, chopped coarsely
1/4 cup flour
1/2 cup Guinness
1 cup water
Salt and pepper, to taste

Melt 1 tablespoon of butter into a skillet. On medium heat, caramelize the onions--stir in the salt and sugar to bring out the natural sugar of the onions themselves. Stir the onions occasionally, and if they begin to stick to the pan, add about 1/4 cup water and stir vigorously for about 30 seconds. This is called "deglazing," and it's one of my favorite science-cooking processes. (Second only to bechamel, which we'll get to in a minute...) Continue the stir/simmer/deglaze process for about 15 or 20 minutes, until the onions start to become darker brown and smell delicious. Then add the chopped mushrooms and stir, simmering until the mushrooms become a little softer, but not mushy.
Meanwhile, (probably while the onions are caramelizing, actually, since you'll be bored anyway) melt 3 tablespoons of butter in a medium saucepan. Once the butter is just beginning to sizzle, add 1/4 cup flour and whisk or stir rapidly, until thoroughly mixed. Then, quickly add the Guinness and 1 cup water, small bits at a time in alternation, stirring after each addition. (The Guinness will get all bubbly, so you don't want to add in too much at once.) Then, add the onion and mushroom mix to the sauce (which should at this point be delighting your nostrils with the decadent smell of beer and butter) and stir, adding in salt and pepper to taste.
This filling can also be made to include other vegetables (peas and carrots are common), as well as meat. If I'd had it, I probably would have thrown in ground beef or chunks of sausage at the mushroom phase. No such provisions were in my freezer at the time, unfortunately, but I'm sure they'd be delicious for you!

Potato Topping
5 or 6 large potatoes, washed and chopped into large chunks
3 tbsp butter
3 tbsp cream
4 cloves garlic, chopped
1/2 tsp nutmeg
Salt and pepper to taste
1/2 cup grated cheese (I used mozzarella and cheddar.)

Preheat oven to 350 F.
Boil potatoes in saucepan of water for about 15 minutes, or until tender. You should be able to poke a fork into a potato chunk and have it split in two. Drain almost all the water from the potatoes, but feel free to keep a little bit. Mash those spuds up with the butter and cream, adding in the garlic, nutmeg, salt, and pepper until the potatoes have reached (almost) optimum deliciousness.
Grease the bottom of a medium casserole dish. Layer in the Guinness-mushroom mixture, then spoon the potatoes on top in heaps, patting down to form a solid layer over the top. Sprinkle cheese over the whole thing, and toss into the oven for about 30 minutes, or until you're too hungry to wait anymore.
DEVOUR, while drinking the leftover Guinness.

Thursday, January 13, 2011

MADE: Peanut Butter Chocolate Chip Cookies

It's been a rough, rainy week, and while grumpily trudging along yesterday, an idea appeared to me like a warm, shining beacon through the bluster of wind and spit that Seattle calls rain--Peanut Butter Cookies.
As I almost dashed home, the lure of future cookies pulling me onward, I called KPBH for aid: "Can you find a recipe for Peanut Butter Cookies? One that will make thick, chewy, warm, melt-in-your mouth cookies? One that will erase the frustrations of a malfunctioning apartment and fill me with warmth to drive away the wet winter chill?"
He was less than helpful.
"Well, they're all pretty much the same...Oh wait. Here's one without butter..."
I almost had a conniption fit, there on the sidewalk. "Cookies made WITHOUT BUTTER? Do I even KNOW YOU?"
Eventually, I took matters into my own hands, and of course found myself at the (figurative internet) door to Smitten Kitchen. I basically used the recipe here, but didn't I have peanut butter chips (who has peanut butter chips?) and I didn't roll the cookies in sugar at the end of the process (thus making them a health food?).
The result? DELICIOUS. Perfect little chunks of peanut buttery goodness, with a thick shortbready consistency and a delightful softness that lasts at least until the next morning. I'm not sure how long it would take these cookies to get hard and crunchy, but it is less than the amount of time that it took for the batch to get devoured by myself and my roommates.

Peanut Butter Chocolate Chip Cookies

1 1/4 cup all purpose flour
3/4 tsp baking soda
1/2 tsp baking powder
1/4 tsp salt
1/2 cup (1 stick) unsalted butter, room temperature
1 cup peanut butter, room temperature
2/3 cup white sugar
1/2 cup packed brown sugar
1 large egg
1 tbsp whipping cream
1 tsp vanilla extract
1/2 cup chocolate chips

Preheat oven to 350 F.
Mix together dry ingredients (flour, baking soda, baking powder, salt) in a large bowl and set aside.
In a large bowl, beat together butter and peanut butter until creamed. Add sugars and blend until creamy. Beat in egg, cream, and vanilla. Add in dry mixture a bit at a time, mixing thoroughly after each addition. Finally, stir in chocolate chips.
Drop by spoonful onto ungreased cookie sheets, leaving a little room for expansion. Press down with a fork to make that classic "peanut butter cookie" crosshatch. (Does anyone know why that's such a peanut butter cookie tradition? Does it help bring out some otherwise latent peanut butteryness?) Bake for 10 minutes, and do not overbake. The cookies won't be browned, but they'll be done, and they'll be DELICIOUS.
Devour, wriggling your toes as the snuggly warmth of childlike bliss fills your soul.

MADE: Grilled Brussel Sprouts


Apparently, when I was little, I used to eat brussel sprouts all the time. Gobbled 'em up. Thought they were great. Then, one fateful day, my mother walked in on the horror of her oldest child eating brussel sprouts and shrieked "WHAT are you FEEDING her? Brussel sprouts? EEEEW." (N.B.: My aunt Marilou was the royal feeder in charge of my nutrition at this point in my life.) I apparently then threw the fork down and refused to eat brussel sprouts ever again.
This little piece of BlissandTell lore is at once a cautionary tale and an explanation for the current recipe. Cautionary tale: Children are ridiculously impressionable, and therefore perfect fodder for social experimentation.  Recipe explanation: Lately, I've been trying to overcome the food prejudices of my youth and experiment with ways of delectifying foods that once grossed me out. Hence, brussel sprouts.
While on a brief, glorious stop through Chicago recently, KPBH's roommate--who's prone to cooking extravaganzas of his own--was whipping up these grilled brussel sprouts, and offered me a taste. Delicious! Probably too delicious to actually be retaining any of the nutritive value of the original sprouts, but I can pretend. Also, they are ridiculously easy to make. So really, this is less a post meant to impress everyone with my cooking prowess and more a post for me to have a record for the recipe, so I won't have to send frantic text messages asking "Hey, can you send me that brussel sprout recipe PLZ? KThx. Lol."

Grilled Brussel Sprouts

1 1/2 lbs brussel sprouts
3 tbsp olive oil
3/4 tsp freshly ground sea salt
1/2 tsp freshly ground black pepper

Heat oven to 400 F.
Chop brown stem ends off of brussel sprouts and cut in half, lengthwise. Toss the brussel sprout halves into a big bowl and throw in olive oil, salt, and pepper. Stir and toss to thoroughly coat the sprouts, then pour them onto a baking sheet. Roast in the oven for about 30 minutes, turning occasionally so that all sides brown evenly. Remove when brussel sprouts are beginning to be brown and crisp on the outside and tender on the inside. Devour.

Monday, January 10, 2011

MADE: Irish Car Bomb Cake

This one goes out to all the kids.
Dear kids: Make friends with people older than you. That way, when you turn 21, they will be able to go out with you, party, buy you drinks, and--best of all--make you a cake of delicious liquory complexity.
My awesome (and ickle) roomie found herself in just such a situation a few days ago, as she turned 21 in a fog of cake and booze. The best kind of fog, really. She had requested a Guinness cake a few months back (probably when I was making my Guinness cupcakes), and I decided to turn her request into a full-blown Irish Car Bomb homage.
Good idea, or best idea ever? The votes aren't quite tallied, but it's certainly up there. Make it and decide for yourself. And then invite some friends to help you consume the leftovers!

Irish Car Bomb Cake

Guinness Chocolate Cake
1 cup (2 sticks) unsalted butter
1 cup Guinness
3/4 cup unsweetened cocoa powder
2 cups all-purpose flour
2 cups sugar (mine was, of course, a mix of mostly white and a smidge brown)
1 1/2 tsp baking soda
3/4 tsp salt
2 large eggs
2/3 cup sour cream

Heat oven to 325 F. Grease two 9" cake pans, or whatever you're planning on making this cake in.
Melt the butter in a smallish saucepan over medium heat, add Guinness partially through the melting process. Bring both to a low simmer and add the cocoa powder, whisking until smooth and delightfully chocolatey smelling (WARNING: Don't lick the batter at this point. Unsweetened cocoa powder will lure you with its chocolatey smell and then punch you in the face with capital-U Unsweet.) Set aside and let cool slightly.
Whisk together flour, sugar, baking soda, and salt.
In a separate bowl, beat together eggs and sour cream until smooth. Fold in the chocolate-butter-Guinness mixture and beat until just combined. Then fold in the dry ingredients and mix until smooth. Divide batter evenly among cake pans and bake for about 35 minutes, or until a cake tester in the center comes out clean.

Whiskey Chocolate Filling
1/3 cup semisweet chocolate chips
1 tbsp heavy cream
Splash whiskey
Splash brandy (for fun)

Melt these delectable ingredients together in a double boiler after you've pulled out the cakes. Pop one of the cakes out of its tin and spread the melty liquory chocolate over the top. Then finagle the other layer of cake on top. (This was the trickiest bit for me. Well, this and managing not to drink all the Guinness pre-baking...)
(Also managing not to eat the cake before it was finished...)


Irish Cream Frosting
1/2 cup (1 stick) unsalted butter, room temperature
2 tbsp Irish Cream Liquor
2-3 cups confectioner's sugar
2 tbsp sour cream
2 tbsp heavy whipping cream

This, I played by ear, which is what one has to do with frostings. You just add sugar and butter and cream and liquor until it looks right, tastes right, and seems like it will spread alright on a cake. The measurements above are probably close..ish?
Mix butter with an electric mixer until it's nice and creamed. Add a tablespoon or so of the liquor to give it a bit more liquidity. Then add in the confectioner's sugar (armed with the expectation of getting a fine dusting of it all over yourself), mixing it a bit at a time. Alternate with dollops of sour cream, whipping cream, and liquor.
When you're done, frost that cake! Then eat the cake! Then use your leftover ingredients to do some Irish Car Bombs with your friends! Because it's college, and that's what you do.
A lesson for the kids, from BlissandTell.